Since I’ve started my PhD in the Cavendish Laboratory, I’ve spent a lot of time SSH’d into various different servers and compute clusters. A lot of the specialist toolkits, licenses and hardware is only available to me remotely and not on my local machine, necessitating a lot of time operating in a linux terminal developing remotely. The alternative is to have a local git repository which I commit to, then push to the remote server, and then pull the changes (over SSH) on the server I want to work on, which is a major pain in the ass and extremely inefficient in terms of development.
There are three main utilities which I use to make an extremely powerful and pretty flexible command line development environment:
- Vim
- Screen
- Git
Vim
Vim (and its ancient predecessor, vi) is by far the easiest to access text editor. It is practically guaranteed that any distribution of Linux or Unix will have this pre-installed and ready to go. All mainstream linux distributions will certainly have it installed, including Redhat, Fedora, CentOS, Scientific Linux, Arch, etc. Although strangely Ubuntu doesn’t have it installed, likely due to space constraints on the distribution. However the server version of Ubuntu(which you may end up ssh’ing into) does have it installed by default.
I am absolutely a Vim novice having used it sporadically over the past 7-8 years, and only recently using it in an every day role. However, what Vim does have against it, at first, is its steep learning curve. It’s not as simple as using nano, another utility which is part of the GNU Project family of open source tools, but it is far more powerful and once you learn the basic commands, its ferociously powerful under the cover. I’ll stop right here and recommend that anyone wanting to learn it inside out should, on their terminal interface of choice, run:
vimtutor
This will open up an excellent tutorial, which will teach you all the basics in a succinct way, driven by exercises. I still refer to it as I learn some of the advanced features of the editor. It’s redundant for me to write a tutorial here because of this, so I’ll list the commands I use every day for a useable vim environment. These commands are accessed in normal mode, which is accessed by the Escape key.
- :w – Write a file, this ones pretty easy.
- i/a/A – Most important of all, switches vim into insert mode. i inserts at current point, a is one character later, and A goes to insert mode at the end of the current line.
- :q – Exit
- :wq – Exit and save current buffer.
- :wqa – Exit and save everything.
- :e <filename> – Close current file and open a new one. Make sure to save or vim will resist you.
- :find <filename> – Find item in currently path and open it.
- :split <filename> – Split the window horizontally and open a new buffer.
- :vsplit <filename> – Same as above but split vertically.
- Ctrl-W W – Toggles through current split screens.
- Ctrl-W <arrow key> – Switches to split screen in direction of choosing.
- :tabedit <filename> – This one is really cool, you can open a separate tab for a new file. You can even split horizontally/vertically within a tab, which is very helpful for referring to different sources.
- :tabfind <filename> – Same as :find but opens a tab with the file when it finds it.
- gt/gT – This will navigate forwards/backwards respectively between different tabs in your vim environment.
- /<string> – Search forwards for something. Hit enter and then n to cycle through.
- ?<string> – Search backwards for something. Hit enter and then n to cycle through.
- :nohlsearch – Removes search highlighting when done.
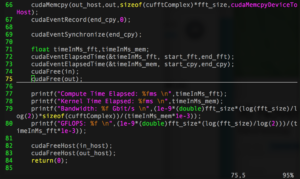
- :make – Helpfully runs make so when done modifying source you can run your makefile, and compile it without additional hassle.
- v/V – Switches to visual mode to start highlighting text/block to allow copying/pasting.
- y – Yanks(copies) highlighted text to clipboard.
- x – Cuts highlighted text to clipboard.
- p – Pastes item in clipboard into switched buffer.
There, 26 commands that will allow you to use Vim with almost no hassle. It does require a bit of practice, but this will lead you onto some of the more advanced features of Vim detailed in the vimtutor. There is a good reason why vim is the most popular command line text editor in the world. It is extremely efficient with some practice.
Another helpful tip is setting up the vim environment. You can do this within the environment using the same :<command> notation we have above. An easier way to set up the look/features of vim is through your .vimrc file. Vim looks for a a file at ~/.vimrc which details all the vim commands to run on startup(its a bit more complicated than that, but on the surface is very simple). My .vimrc file is below:
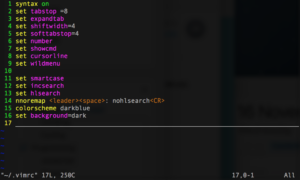
In this I have forced syntax highlighting on, which is a must for any developer, as well as setup my tab spacing to keep the Python interpreter happy. I also have the line numbers turned on, as well as showing what keys I have pressed, a line indicating the current cursor, and also a cool feature called wild menu which allows me to list all the options of something, such as :color, by doing :color <Tab>.
In addition to this I have also setup smart case searching, so if an upper case letter is used, the search term automatically becomes case-dependent. incsearch allows incremental searching so as you type in your search term vim looks for the string and as you type more it further refines it. hlsearch highlights your search item to make it easier to see. The last thing I do is map space to toggle off the highlighted search and set my color scheme and background to my preference. (Hint: set wildmenu then type :color <Tab> to see what schemes are available!)
And that’s that on using Vim as a simple but powerful command line development environment.
Screen
One area where vim can’t help us is if we need to run some terminal/bash commands whilst writing code. Vim is only a text editor(as per Unix philosophy) and can’t run a shell within it. And a shell can only run one interactive process at a time. Thus running shell commands would require us to quit vim and run those commands, which would be a major pain if we have lots of tabs and buffers open. There are ways around this in terms of saving Vim’s state but an easier way is to run two separate command lines at once, one being responsible for Vim and the other for something else. To do this we need a terminal multiplexer, which allows a single ssh session to run multiple terminals within it.
There are two main multiplexers, GNU Screen, and tmux. Screen is most likely to be found on almost every mainstream distribution you might end up using or ssh’ing into., and because of this is the one we will be using as we want to setup an agnostic linux/unix command line dev environment.
To run screen is quite simple, if it is installed you can type ‘screen’ and you should get a license agreement which you then agree to and it runs. The 8 critical commands to get going are:
- Ctrl-A S – Horizontal Split
- Ctrl-A | – Vertical Split(Might not be installed on some computers)
- Ctrl-A C – New Bash Terminal. Use this is in an empty split to get a command line going.
- Ctrl-A <Backspace> – Previous bash terminal/screen window
- Ctrl-A <Space> – Next bash terminal/window
- Ctrl-A X – Remove current session.
- Ctrl-A \ – Kill ALL screen windows. Only use this if you don’t want to re-use a screen session.
- Ctrl-A D – Detach from current session.
With these 8 commands you can get almost everything working in screen to setup a nice development environment. The last command is by far the most powerful as it allows me to detach my screen session and keep it running in the background on whatever server/desktop I am ssh’d into. I can then re-ssh into the same system and use the command ‘screen -list’ to get a list of all screen sessions still running.
To reconnect to a screen session, use ‘screen -r <display_no>’ , and your screen session will re-appear. Splits are not preserved unfortunately, but this is solved by something called nested screen sessions, which is beyond the scope of this post. If you have a screen session you don’t need anymore use ‘screen kill <display_no>’.
Git
The last thing to get a development environment working is to have some form of source code control, for everything that you work on. It will save your life should you need to revert to a previous version, and if you have your source code hosted remotely, such as on Github or a private (backed up) ssh server, it will save you from nasty system wipes or other unfortunate events.
There is an excellent tutorial on GitHub, which will do the subject far more justice than I ever could:
Other Useful Utilities
Depending on what you are doing there is a multitude of useful tools that come pre-installed on Unix or Linux systems, or are easily available. I won’t mention the GNU coreutils which is truly vast:
- Nix – A cross-platform package manager which is purely functional. This means you can build isolated sandboxes for builds and test your code against different compiler versions/flags etc. You can even tell it to recompile the utilities from source with your own flags. It is extremely powerful, however its documentation is lacking and improving at a snales pace, and as I get more used to it, I will write a blog series, or perhaps even a cookbook on how to use it.
- htop – Most systems come with top installed already, but I like to download and install(through Nix) a system monitor called htop. This gives me a nice overview of my cores and system memory usage, as I do a lot of scientific computing. For GPU development unfortunately it doesn’t support that, and perhaps I’ll find a tool for that and write about it!